
Someone brought it to my attention (thank you!) that the pictures went missing from this post! With my kids all out of diapers for a while now I had not even thought to check on this post. It seems I lost a lot more than I thought I had when I switched servers last year, but I’ve located everything except the snap tutorial pictures.. thought I think I can find them.
I’m going to repost this as current so it gets back out there 🙂 enjoy!
ETA 8/27/10: I just want to say THANK YOU to everyone that passes through here and shares this link with others! I am simply floored at how much traffic this post gets every day! I’m so glad it seems to be helpful to so many people! Don’t hesitate to leave comments!
5/6/10: I finally found the time to update my PreFitted Tutorial with all the bells and whistles! This is the luxury edition, complete with velour! haha
This is a very simple and inexpensive way of turning prefolds you already have into adorable fitteds without using a serger. Several things have changed with this new tutorial and I will try to explain everything in full detail, so it’s picture obese! If I’ve left anything out or you have any questions, please let me know!
To start, get your materials together: prefolds, elastic, decorative print (anything goes here ie: flannel, cotton weave, knits and if you use poly fleece you will essentially end up with an AIO), velour (for the lux edition, haha) and your pattern.
You may also want to add touchtape or snaps. Personally I prefer pins or snappi’s. If you are planning on using snappi’s make sure your decorative print is snappi-friendly (ie: knits, velour, stretch terry, some flannels, etc.).
Just a tip: wash all your fabrics (I even wash my elastic!) before cutting to avoid shrinkage issues and to remove any yukky residues left behind from dying, manufacturing and shipping.

Disclaimer: Yep, the prefold I’m using here is stained.. I’m not a stickler for stain removal in dipes, they all eventually come out in the wash and this one has already gone through 2 kids so it’s old to boot. And yes, I’m still using my grams ironing board complete with the ratty old stained cover I can’t seem to part with – it’s clean, just looks crappy.. nevermind it. 🙂
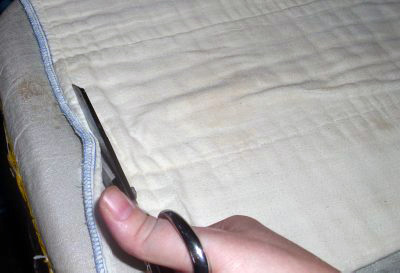
First, iron your prefold (and the rest of your fabric) – they are so much easier to work with once ironed. Then cut the serged edges off – OR you could seam rip the edges. Any prefold will work, even gerbers (which don’t turn out half bad either, I did half a stash for my bud Suzie and she loves them) but here I’m using a premium unbleached chinese one.
Lay your pattern down over the ironed prefold and trace it out with a washable marker. Make sure to mark your elastic. Trace it out on your decorative print as well and cut both out. I’m using the final edition of the one-size pattern I drafted.
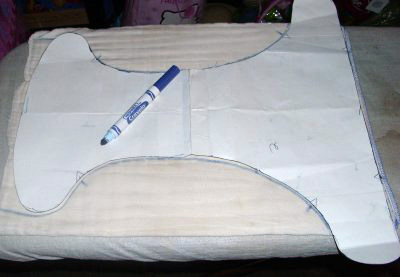
When I draft patterns I don’t add seam allowances. Instead I trace it out and cut a quarter inch or so outside the line. This way I can just sew down the line for perfect edges. If you are using or have drafted a pattern with seam allowances cut right on the line.
Just a tip: when cutting apart an old prefold you may find lint buildup stuck along seams and in corners, sweep it all out to maximize bulk reduction.

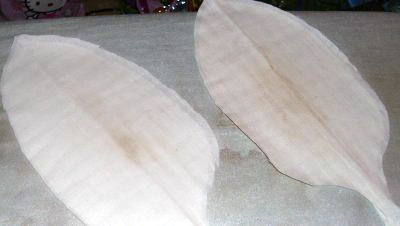
The excess will make the soaker, lets start here.

Open it up on the fold and press.
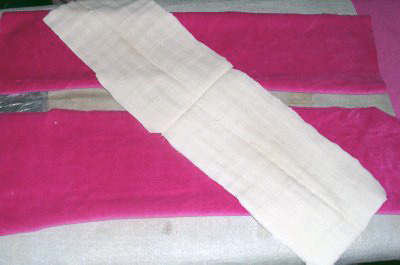
Depending on your pattern, you may have more or less than I do here. Define an even rectangular shape out of the scraps, stack them together and stitch down one of the short ends.

Open it up, lay flat and press. Here’s your soaker panel.

Time to break out the velour! Or whatever fabric you have handy, but lets face it – velour is softest and squishously yummiest to use – hence the Lux! Cut out 2 rectangles the same size as the soaker panel.
Place the velour right sides together and top with the soaker panel, pin three sides together and sew.
Trim off the excess, anytime you are going to turn and topstitch you wanna reduce the bulk as much as possible. Turn it right side out.

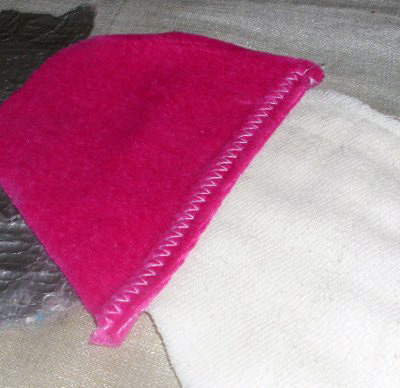
I like to do a 3-step zig-zag stitch down the center of the pad to avoid shifting during washing, then topstitch.
Center the soaker panel where you want it on the right side (or the side without the pattern lines) of the prefold.

Attach it with a tight zig-zag stitch twice over.
Depending on your pattern and the size/brand of your prefold, you may want or need to extend the wings. Since I am using my one-size fitted I want the wings to match so I’m adding some velour and you can do the same. Just lay the prefold over the decorative diaper cut and cut the excess out of velour making sure to account for seam allowance.
Pin them on and stitch right sides together.

Press the seams toward the velour and stitch down for added strength.

You can use straight stitch, but I think a zig-zag stitch will prevent fraying better.
Next you’ll want to trim away some excess bulk at the back of the prefold where the elastic will go.

Just separate the layers in the center, clip about 3/4 of an inch on each side and trim away.

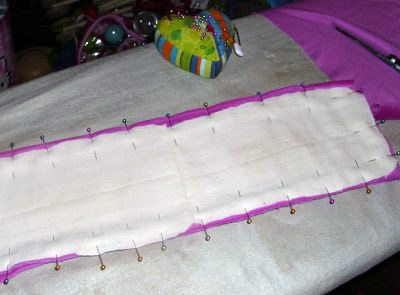
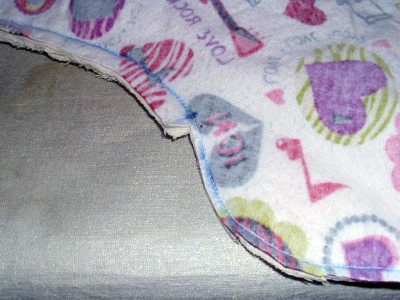
Center your decorative print over the prefold and pin. I’ve used a snuggle flannel here with an awesome print that was graciously sent to me by my friend Suzie!

You are not going to stitch down the front, instead leave the entire length open for turning. I always pin to prevent shifting while sewing, especially with knits. Stitch down the line, unless you used a pattern with a seam allowance. In that case, use whatever seam allowance the pattern calls for.

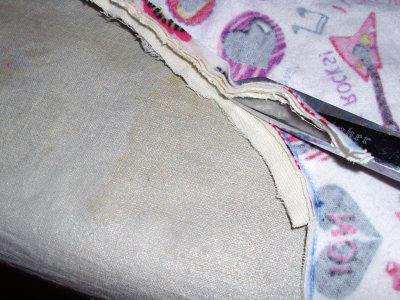
When you are done stitching, trim away the excess outside the marks you made for the elastic. This will leave seam allowance only where the elastic will go.
Separate the layers of the remaining seam allowance leaving only 2 or 3 layers of the prefold and trim away the rest. This will remove the bulk and allow the elastic to stretch and relax to it’s full extent when tacked down. I find 2 layers is sufficient, but if you are using something very old and worn you may want to use 3.
ETA: After some thought, I decided clipping away the outer layer of the remaining seam allowance could cause some fraying – NOT that I had any, I’m just always thinking of how to improve things – so instead clip away everything BUT the outer and inner layer.. just incase!
Here is what it should look like when done trimming.

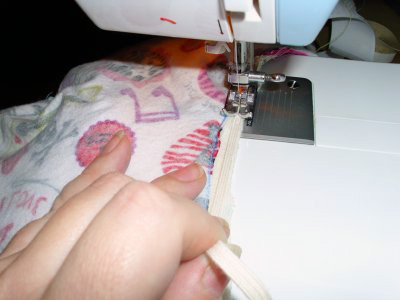
I like to tack elastic down the seam allowance using the 3-step zig-zag stitch. Tack the end down by going back and forth a few times then stretch it pulling tightly to the end of the exposed seam allowance. Be sure to go back and forth over the opposite end as well.
Here is what it should look like with both the leg and back elastic in place. This is also what it looks like when my cat refuses to get off the ironing board. 🙂
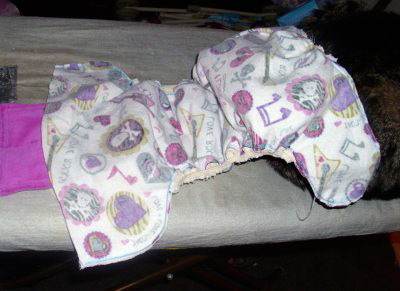
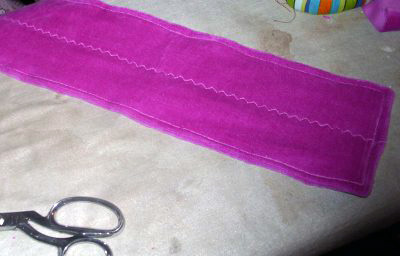
Turn it out, press if you like (and I do like to because I find I end up with crisper edges) and topstitch around the front and back wings. I do not topstitch around the leg elastic in this particular design because the bulk of the prefold will end up hindering full usage of it.
To finish, lay the front opening flat, press and trim any uneven edges. Then just close it up with a tight zig-zag stitch twice over.
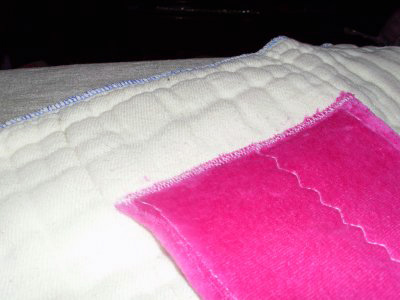
Here is the inside, you may end up with a shorter or longer soaker panel depending on your pattern. I find longer is better because you can fold it up in front for boys or in half for girls!

Here is the outside laid flat.
Just a tip: Never wash using a heavy duty spin cycle. Diapers can fray and get ruined. (Found that one out the hard way!)

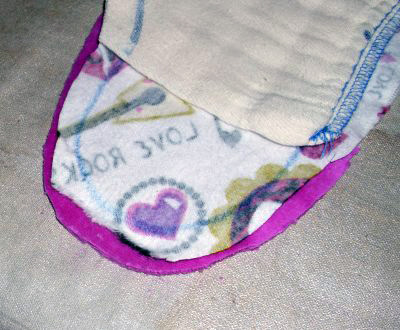
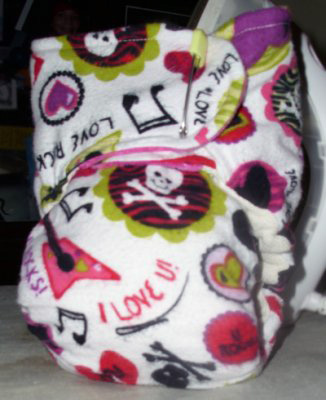
All pinned up in front.
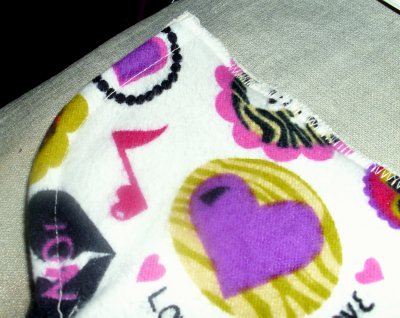
Side view. If you notice, one of the benefits to not topstitching around the elastic is that the decorative print ends up rolling in creating a softer leg casing in most cases!
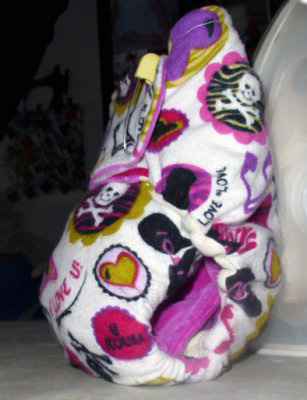
A very grumpy Lucas in need of a nap did not want to model for me so the action shots are limited and crummy! Hopefully I’ll get better ones after it’s washed again.. and of course since it’s a one size, I can use it on Raven too! It will look better on her anyway! haha Luke can rock the girlie prints though!

***please bear with me while I track down the rest of these pictures***
UPDATES UPDATES UPDATES UPDATES UPDATES
While I’ve loved my snappiable/pinnable dipes for a LONG time, I currently have snap fever! I’ve been adding snaps to all my old diapers and decided I’d add them to all my prefitteds as well.. SO I though I’d add a few tips for good snap placement and application! Plus a plethora of new pics of course! Some of the newer prefitteds I’ve made have nifty variations as well!
But first, a few snap tips!
(please excuse the crummy diaper I am using as an example here, it’s old, the wings are all uneven from use and I had just ripped some worn out touchtape off of it and quickly replaced the leg elastic.. I made this diaper, while I was still working out the kinks in my tutorial, out of a flimsy prefold so I added a layer of velour to the inside – which is something I wouldn’t do with a premium prefold)
Ok, first tip: if you are using a premium quality prefold it is going to be thick! Sometimes that initial ironing has worn off by the time you are finished and the prefold has quilted back up again! And sometimes ironing it doesn’t seem to get it squished down enough, so my tip here is to wet it! You can even use your iron Just squirt the front where the snaps will go, stretch it out and flatten with your hand. If it’s still stubbornly quilty, add a bit more water and run the hot iron over it again. THIS is crucial. If you just add the snaps, weather with a press or pliers, the likelihood of them popping out over that thick area is high. I wasted quite a few snaps when I first snapped them!
And the second tip is for perfect snap placement. Sure, you can use a template and mark out where you want your snaps with a washable marker but I’ve had mixed results with that method and I decidedly don’t like it. I like to use 2 snaps on each wing (I know some of the expensive fitteds use 3 but I’ve really found that to be excessive). I fold the back of the diaper in half and line up the wings. Then with my awl (or in this case, one of my professional cuticle pushers.. haha) I poke 2 holes straight through both wings.
This gives me perfect and even snap placement on the wings. They are generally 2 inches apart, but depending on how you do the wings (ie; if you have to extend them) you may not be able to put them exactly 2 inches apart (since you wont be able to get a snap through the extension seam).
Next I fold the front (that I’ve flattened out as much as possible) in half to find the center and poke a hole straight through about half an inch in.
This puts the center snaps about an inch apart. Next I attach the first wing snap to the center snap closest to it and line the wing up along the diaper. Then I flip the diaper over, locate where the second wing snap is with the ‘awl’ and push it through.
Then I place a snap between those 2 and continue in that fashion to the end. You could also fold the front down and add snaps to make it a true snapped one-size, but I personally find snaps cumbersome on small babies that aren’t crawling/walking yet and have never used the fold down snaps on any of my one-size fitteds. It is just as easy to fold down the front and use a snappi or pin, plus you don’t use up so many snaps.
Also, I do not snap the soakers. If you have ever tried to replace elastic in a turned and topstiched diaper with a snapped in soaker, you know exactly why! It’s no fun at all.

Oh, I LOVE IT! I will sooooo be trying this after I get access to a machine! lol. That dark pink velour matches that pattern perfectly! I’m glad you liked it and found a good use for the pattern. I knew you would. I’m wondering though… what other materials besides a prefold would you recomend for the inner layers? I’m sure terry would work okay, or microfiber since none is exposed to the skin. Just trying to think how I could do this one without running out to buy more prefolds. I already have some flannels and that “ultraplush” from those blankets that feels very similar to velour on one side… just need a good inner that I already have around the house, lol. THANK YOU for posting this. Your step by step instructions and pictures will be a great help when I’m ready to get started! ❤ Suz
prefold to undies? have any ideas on that? for I have 3 dozen gerber prefolds and need undies….
@VioletMoonDancer7 – I can’t really recomend anything other than a prefold since this is a prefold to fitted tutorial (hence the name ‘prefitted’).. without the prefold it’s just a fitted! You can use anything you like really – I know you have fleece which you could use for an outer and flannel which you can use for an inner. As far as absorbancy goes, whatever works – works! Old towels, t-shirts, flannel – whatever you are stuffing your pockets with now can also be used to make soaker panels.Glad you like the tut – took me long enough to redo it.. haha!
@momsdaughterof2 – I’ve never turned a prefold into a pair of undies, but I’ve used them in making training pants.. is that what you’re looking for? Pretty much the same idea here depending on what you are looking to use them for. I like to use knits or fleece in training pants though so they are easy to get up and down. If it’s training pants you are looking to make, I can definatly help.. I’ve spent a lot of time working with them. Let me know!
Yes training pants for my 14 month old who is trying to use the potty.
wow, i have never seen anything like this, i dont have any children yet but this is very cool!
gosh, yours are so nice! I have given up on sewing and now I am knitting. I just could never make a decent dipe!!!
@Jerkazadee – haha and I gave up on knitting! Well not really, I do like to knit but I don’t have time. Sewing is much faster for me. What have you been knitting?
I have knitted 2 skirties, one pair of capris and a pair of longies! I find it very therapeutic! Lol whereas sewing stressed me out because I could never get it right!! Lol
I love knitting and sewing Knitting I do more offten because I dont have much space to spread out the sewing unless I have the floor in the living room and with a 14 month old that only happens at nap time which she has been refusing to take.. One day i’ll get a bigger home.
@Jerkazadee – Oooh I checked your blog and saw the pictures of the capris.. AWESOME! Gosh you are great at knitting, I suck! I am not a fan of taking care of knitted longies but I have really been wanting a skirtie for my little chunker girl.. I just think she’d look adorable in one. I have some yarn sitting here, would you be interested in knitting it into something if I sent it to ya? I’ll make you whatever you want!
@organicallythin – Thanks! If you decide to cloth diaper when you do have kids, I’d be happy to make you some fluff!
@momsdaughterof2 – Have you ever used Katrina’s Quick Sew Soaker Pattern? There is a link to it in a blog I wrote about using that pattern for training pants here: http://hatcherbee.xanga.com/704610264/fleece-trainers/I made them adding a pocket to stuff, which you could also do trifolding the gerbers for stuffing. Or you could just sew them directly inside. Really you could use any training pants pattern and just use the gerbers for the absorbant layer.I know what you mean about having no room.. I usually do all my cutting on my ironing board to keep it out of all my kids reach, but sometimes I get to spread things out on the floor… I just have to find something to distract them with like play doh or paint! haha
I wish I could cut on my ironing bord mine is the one that hangs on the closet door.. I have a full size one but no where to set it up.. I dont like small houses but one day i’ll get the one I wantedlt built …Thanks for the link for the pattern I have been searching for trainers and have come up with no patterns Driving me crazy I did find side snaping knickers.
@hatcherbee – oh I am not that good yet!!! I made a normal skirty with the soaker and I made a skirty with bloomers! I should really take pics! but my work isnt flawless yet, so its your call! my first 2 projects are the ugliest! lol
her eis a pic of my first skirty. the skirty with bloomers. my very first project was these longies and of course the capris what do you think?!
@Jerkazadee – Well I think they look great! Your first longies look better than mine did! I was so disgusted with my first project that I ended up pulling it all out! I never even attempted another pair, I’ve made some scarves and hats, a little purse for my older daughter and a blanket. When you feel you’ve had enough practice I would totally want you to do it!
Thanks for the insight. I think I may go out and buy one batch of gerbers (and wash the HELL out of them! lol) to make my first pattern and try it out, but after that I’ll probably do this same multilayer technique using either terry or microfiber in place of the prefold layers. I can’t WAIT to get started! (c’mon tax forms!!! lol) ❤ Suz
i have been searching ALL OVER for a good prefold-to-prefitted tutorial/pattern. i love your tutorial! thank you so much for sharing! i am a novice seamstress so every single bit of detailed instruction helps. also, i have had similar issues as you with regards to finding a prefold-to-prefitted pattern that i like. can you please tell me where you found your pattern?? i have NO idea how to go about making my own…thank you!!
@lolamia – I’m glad you like it, and I hope you find it useful! The pattern I used in this tutorial is my fitted pattern. I drafted it myself after a few years of making diapers and LOTS of tweaking! Having 20+ years experience sewing, drafting patterns is so second-nature for me I might not explain how I do it very easily. I measure my kids and go from there when I make just about anything for them. I can point you to a free one-size pattern that is very versitile, you can find it here: handmadebyrita.blogspot.com/ . It’s what a lot of diaper makers start out with… hope that helps!
Great job showing how to make a diaper! They look good, on your babies too! I too prefer pins over snaps!
Somehow, I get the feeling you were thinking of me when you put in the snaps tut. Thanks!! ALL of the diapers look wonderful! Oddly enough, the one you called “crummy: was one of my favorites! lol Well, time for me to make another attempt at bed. ❤ Suz
@VioletMoonDancer7 – No, actually I added it for KAMsnaps! They contacted me and asked if they could add this tute to their site and put in how I add snaps to them! So I did! And they added it AND sent me a gift cirtificate! It was very exciting!
Oh awesome! Yayness for you! I have questions though now. LOL. Is this tute only for the plastic/resin snaps? What would differ if you used metal snaps instead? ❤ Suz
@VioletMoonDancer7 – Yes this would just be for puting the resin snaps in prefitteds. There is no way you could ever put metal snaps through a thick prefold.. haha. Plus you wouldnt use an awl for standard metal snaps either. You could use it to get an idea for snap placement, though I only use this method of snap placement with prefitteds specifically because of the seams in the extended wings.
So on the snaps you do them by hand and not one of the hand pliers? These are wonderful! I have made 4 so far (I am due next week) and have been putting velcro on them. I really suck at elastic though. I am going to look at a different type of elastic next time. I will have to follow this too with the next Diaper I do. Thanks!
@buddosmommy – I have pliers and a press and use both while applying resin snaps (all of which I purchase(d) at http://www.kamsnaps.com). The only snaps you can apply by hand are sew on metal snaps or hammer on metal snaps – neither of which I would reccomend for prefitteds.This is hands down the best elastic for diapers. It is the only elastic I will use and Very Baby is the only place I will order it from. I have diapers made with it that have gone through 3 children that stretch like new! If you need help with the elastic, let me know, maybe I can help you understand how to put it in better
@hatcherbee – ok I will buy some of this elastic right now and see if it makes a differece in sewing. I found your article on cafemom’s group. I am going to make another diaper hopefully tomoorow.
Thanks so much for this tutorial! My 23 month old is outgrowing all our one-size dipes and instead of buying XL Happy Heinys or something like that I wanted to just get some more prefolds and so something like this but I have no serger. This will be perfect! And I have really struggled with snaps. This REALLY helps! 🙂
Where did you get the other two pieces for the fitted? I’m confused. It looks like you have just two from each side, and suddenly you have four??
@LInnea – I mean the soaker. The long piece that goes in the middle.
@Linnea – I’m not sure I know what you mean. All that is pictured and used in the soaker panel are 2 pieces cut from the prefold scraps. The scraps pictured have been unfolded and pressed, though you may be seeing the fold line due to the staining? I’m not sure if that’s what you meant, but I hope that helps.
I am making one the diapers now. Flannel as the outside and fleece and the prefold scraps on the soaker tongue. However, I want to add PUL somewhere to make it an AIO. And I’m not sure where to place it. On the tongue soaker or between the prefold and the flanne?
@Ashley – Yes, you can add the PUL inbetween the prefold and flannel to make it waterproof. I’ve used PUL alone and fleece alone as the outer to make AIOs as well.
Awesome tutorial! I’m going to make one tonight. I’ve been dying for something easier since my 12 month old is such a grump at changing time and he keeps messing the prefolds up when he kicks and squirms. He hasn’t realized yet that that just makes changing time last longer. So this will definitely simplify my life. Thank you so much for such an easy tutorial to follow!!
@cptrbrown – Thanks! I’ve definitely been in your shoes before! If you post your results somewhere I’d love to see!
@Rachel Brown Richards@facebook – Awesome! Thank you for letting me see, they turned out great!!
[…] switched servers a while back I lost a lot of content, including tons of pictures! You can find the updated version of this turorial here. […]
[…] I switched servers a while back I lost a lot of content. You can find my updated Prefitted Tutorial here. Thanks to all that reported broken links and missing pictures […]