
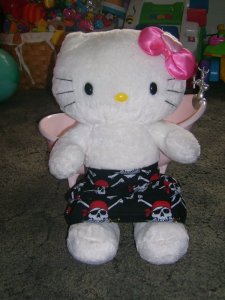
My Willow LOVES Build-A-Bear. For her 2nd birthday, back in December, I took her there for the first time and she came home with her most prized possession (Hello Kitty of course) to this day. Since then, both her and Zack have been there multiple times and our house now has 3 ‘bears’ and a plethora of accessories and clothes. But anyone that has been there knows, this stuff ain’t cheap!
I had been rolling around the idea of making doll clothes for a while and got my opportunity a few days ago while finishing up one of the summer skirts I’ve been pumping out for Wills. She checked it out as I finished and promptly said, “I want Kitty to have one too”. So I pulled the fabric I was working with back out and whipped one up.
 It was SUPER easy, anyone with even a tiny bit of sewing skill can do this in about 15 minutes. I did it in the same style as my tutus, just a waistband and gathered skirt with a touchtape closure.
What you will need:
2 rectangles of fabric 18″ x 3″ and 25-30″ x 4″
3″ of your favorite touchtape, both hook and loop.
Fold the smaller rectangle in half lenghtwise, right sides together. With a 1/4″ allowance stitch the folded edges down, turn right side out and iron. This is the waistband.
Hem 3 sides of the larger rectangle about 1/4″, however you like and topstitch. (since it probably wont be getting washed, you don’t need to worry too much about fraying or finished edges, unless you are a perfectionist like me). Gather the unhemmed edge, either by machine or hand. (I prefer hand gathering with pins here because it gives a nice evenly spaced little pleat). This is the skirt.
Pin right sides of the waistband and skirt together and stitch with a 1/4″ seam. Iron seam up and topstitch to waistband. Add the touchtape to the ends of the waistband, remembering one side will go on the front and one on the back. There you have it, an easy peasy Build-A-Bear skirt!
I’m already working on other things and will draft up some patterns if anyone is interested.
I had been rolling around the idea of making doll clothes for a while and got my opportunity a few days ago while finishing up one of the summer skirts I’ve been pumping out for Wills. She checked it out as I finished and promptly said, “I want Kitty to have one too”. So I pulled the fabric I was working with back out and whipped one up.
 It was SUPER easy, anyone with even a tiny bit of sewing skill can do this in about 15 minutes. I did it in the same style as my tutus, just a waistband and gathered skirt with a touchtape closure.
 What you will need:
2 rectangles of fabric 18″ x 3″ and 25-30″ x 4″
3″ of your favorite touchtape, both hook and loop.
Fold the smaller rectangle in half lenghtwise, right sides together. With a 1/4″ allowance stitch the folded edges down, turn right side out and iron. This is the waistband.
Hem 3 sides of the larger rectangle about 1/4″, however you like and topstitch. (since it probably wont be getting washed, you don’t need to worry too much about fraying or finished edges, unless you are a perfectionist like me). Gather the unhemmed edge, either by machine or hand. (I prefer hand gathering with pins here because it gives a nice evenly spaced little pleat). This is the skirt.
Pin right sides of the waistband and skirt together and stitch with a 1/4″ seam. Iron seam up and topstitch to waistband. Add the touchtape to the ends of the waistband, remembering one side will go on the front and one on the back. There you have it, an easy peasy Build-A-Bear skirt!
I’m already working on other things and will draft up some patterns if anyone is interested.
